Showing posts with label broken dish mosaic. Show all posts

Wednesday, June 8, 2011

My Newest Mosaic


I have been working on a new mosaic for some time now as I couldn't quite figure out what I wanted to do with the background. 

The mosaic is made of different patterned dishes that I cut to make the pinwheels and then added various accents such as half marbles, glass tiles and ceramics.

I knew the theme would be blue because I had so many pretty dishes with blue in them, but trying to decide whether to continue the blue theme or just use white took a while to decide.
As you can see, I chose the baby blue glass tiles and a soft custom made lavender grout for the backgound. I am happy with the affect.  Now if I could just get a good photo.

Thursday, May 5, 2011

My Newest Mosaic

Some time ago I bought this ceramic plaque (lower right hand corner of mosaic) knowing
that I would use it in a mosaic one day.

It has sat on my shelf now for nearly a year and I finally found a lovely rustic metal cross to go with it.

I kept the theme more organic and used earthy colors for a more subtle appeal.


Until Next Time :)
Chris


Monday, March 21, 2011

Customer's Photos of Custom Mosaic

Doing a custom mosaic is always a challenge because you have so many variables going on, such as colors, patterns and overall design that you just hope what you have in the end is what your customer wants.

Thankfully this mosaic was a take-off from one I had in my shop.  The size changed as did the dish tiles and some of the coordinating pieces,  but the overall design was the same.

My customer wanted a large mirror for her bathroom.  This one finished out at 28" x 32" with a 22" mirror in the center.  Fortunately I was able to purchase such a large mirror at an IKEA store.

I just got the photos in my email today from this custom  mosaicI did several months ago.  The woman was pregnant and her baby was due the following month so she was rather busy.

Here are the photos she sent to me.


Friday, March 18, 2011

March Sale on Mosaics and Supplies

I am having a March Madness Sale in my mosaic shop as well as my supply shop. Everything is 10% off for a short time.

Be sure to use the code shown in the announcement of each my shops as it will automatically deduct 10% at the time of purchase.

If you have been waiting for a sale...this is it!  I won't be having another one until much later this year.

I hope you will stop by.


Monday, February 28, 2011

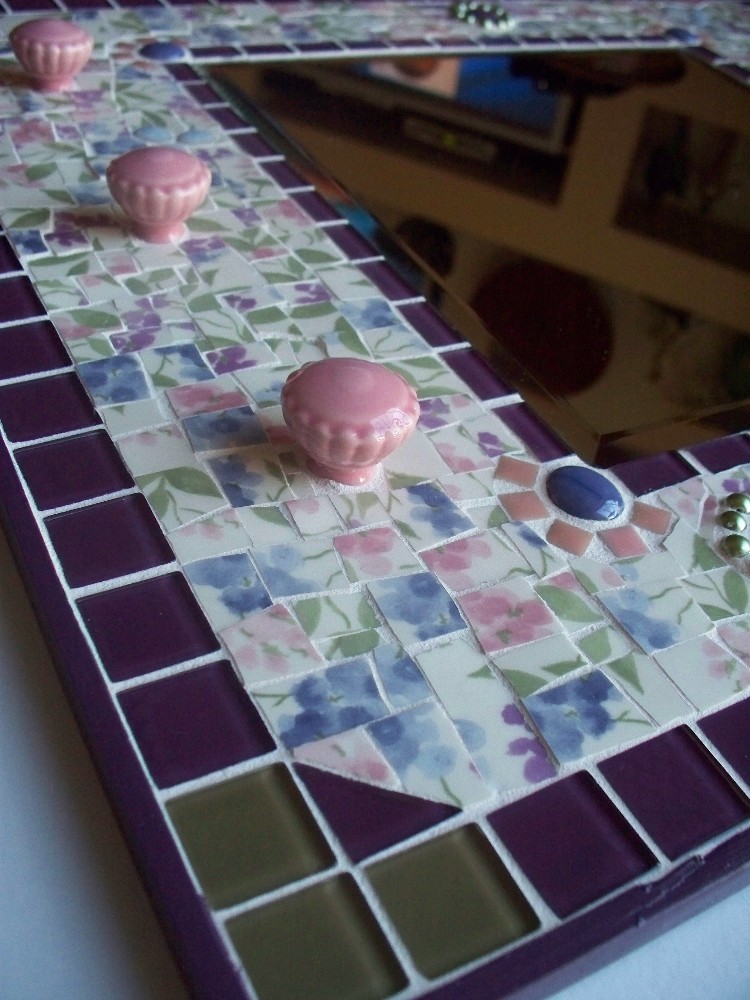
"Lilacs" New Floral Mosaic Mirror

I just finished making this mosaic last night and have managed to get it listed today.

I have to say it was a very labor intensive piece as it took 8 dinner plates cut into small tiles to make this large mosaic.

I love the bright lilac colored glass tiles around the border and was happy they matched the lilacs in the pattern so well.

The 3 little ceramic knobs were just too cute when I saw them at Hobby Lobby so I decided I just had to have them for this one.

Tuesday, February 8, 2011

It's Finished!

I finished the custom mosaic this morning.  I had a few areas that needed a little more grout so I mixed a small batch and worked on that then painted the back a flat black.

I applied 5 coats of sealant to the grout knowing it will be hung above a stove so I hope the extra will help it to repel staining.  I am enclosing some of the powdered grout I used in a baggie so that if it should get some sort of stain on it the customer can easily fix it.

Since the area is cramped for space I decided it might be a good idea to use picture frame wire for hanging.  Usually I would hang 20lb. D-rings on either side assuming the customer would have large hooks, but I think it will be a bugger to try and hang it that way with the cabinets hanging down and  obstructing the view.

The finished size is 16x28

Saturday, January 29, 2011

Custom Mosaic Continued

I have started piecing the tiles to fill in around the main design.  This takes time and patience as you want to get them as close together as possible and there are lots of curves to go around.

I found some fun bright yellow dishes with a royal blue pattern and I thought it would be the perfect thing to go with this mosaic.  I used them in the fan design at the lower left side.  They are rather thick dishes and would be too much of a variance in height for many of the tiles, but it works when you have the gems butted up against them.

The photo above is upside down so I could work on filling in the top.  I decided to glue what I have down and let my husband get the half plate embedded on the bottom (for a shelf).  He will need to cut out the area I have sketched in and set the rough edge of the plate down inside the wood.  He will then fill in any areas with wood glue and let dry overnight.

Next my husband will sand down the glue so that it's flush with the mosaic front and back.
After that I can finish it up and see what my customer thinks before I grout.  At this point I can still change things around a bit.  Hopefully this will be good to go.

The dish tiles on the bottom of this photo are very similar in color but have a completely different design.  One has light blue polka dots against a darker blue and one has light blue swirlys against a darker blue background.  It keeps the continuity and flow but creates more interest.

I'll show you the little "shelf"  once it's dry and sanded.

Until Next Time. :)

Wednesday, December 15, 2010

Pique Assiette

When I first started doing mosaics I learned that the broken dish style of mosaics was called "pique assiette", a french term for using pieces or broken ceramics.

My style isn't really broken as I hand cut each tile, but it sounds more elegant to say pique assiette.

For some time now I have been challenging myself to new ideas, new looks and new methods, but I still love the "broken dish" look of a mosaic more than any other.

I just completed a new one that is primarily made from a lovely brown floral print that I pared with an aqua and turquoise ivy patterned dish.  Actually, they are 2 of my favorite patterns of all and I use them often.

I am still looking for the right name for this one, but for now I call it "Southwestern".  I think it reminds me of the southwest due to the color scheme and the fact I added the copper beads on the upper corners of the mirror.


I have a large custom order I will be working on this next week so I plan to share it from start to finish here on my blog. I hope you will join me.

Until next time. :)