I am having a March Madness Sale in my mosaic shop as well as my supply shop. Everything is 10% off for a short time.
Be sure to use the code shown in the announcement of each my shops as it will automatically deduct 10% at the time of purchase.
If you have been waiting for a sale...this is it! I won't be having another one until much later this year.
I hope you will stop by.
Showing posts with label mosaic. Show all posts
Showing posts with label mosaic. Show all posts
Friday, March 18, 2011

Monday, February 28, 2011
"Lilacs" New Floral Mosaic Mirror
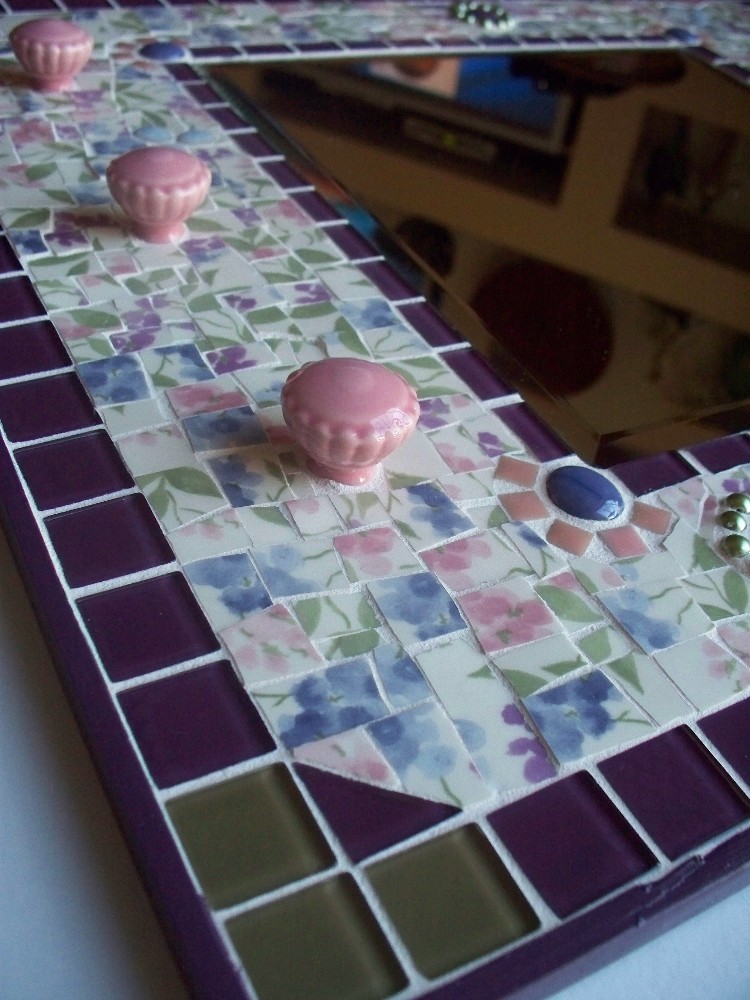
I just finished making this mosaic last night and have managed to get it listed today.
I have to say it was a very labor intensive piece as it took 8 dinner plates cut into small tiles to make this large mosaic.
I love the bright lilac colored glass tiles around the border and was happy they matched the lilacs in the pattern so well.
The 3 little ceramic knobs were just too cute when I saw them at Hobby Lobby so I decided I just had to have them for this one.


I have to say it was a very labor intensive piece as it took 8 dinner plates cut into small tiles to make this large mosaic.
I love the bright lilac colored glass tiles around the border and was happy they matched the lilacs in the pattern so well.
The 3 little ceramic knobs were just too cute when I saw them at Hobby Lobby so I decided I just had to have them for this one.

Saturday, October 2, 2010
Help Me Decide
I could use some input on the color of grout to use in a new mosaic I am working on.


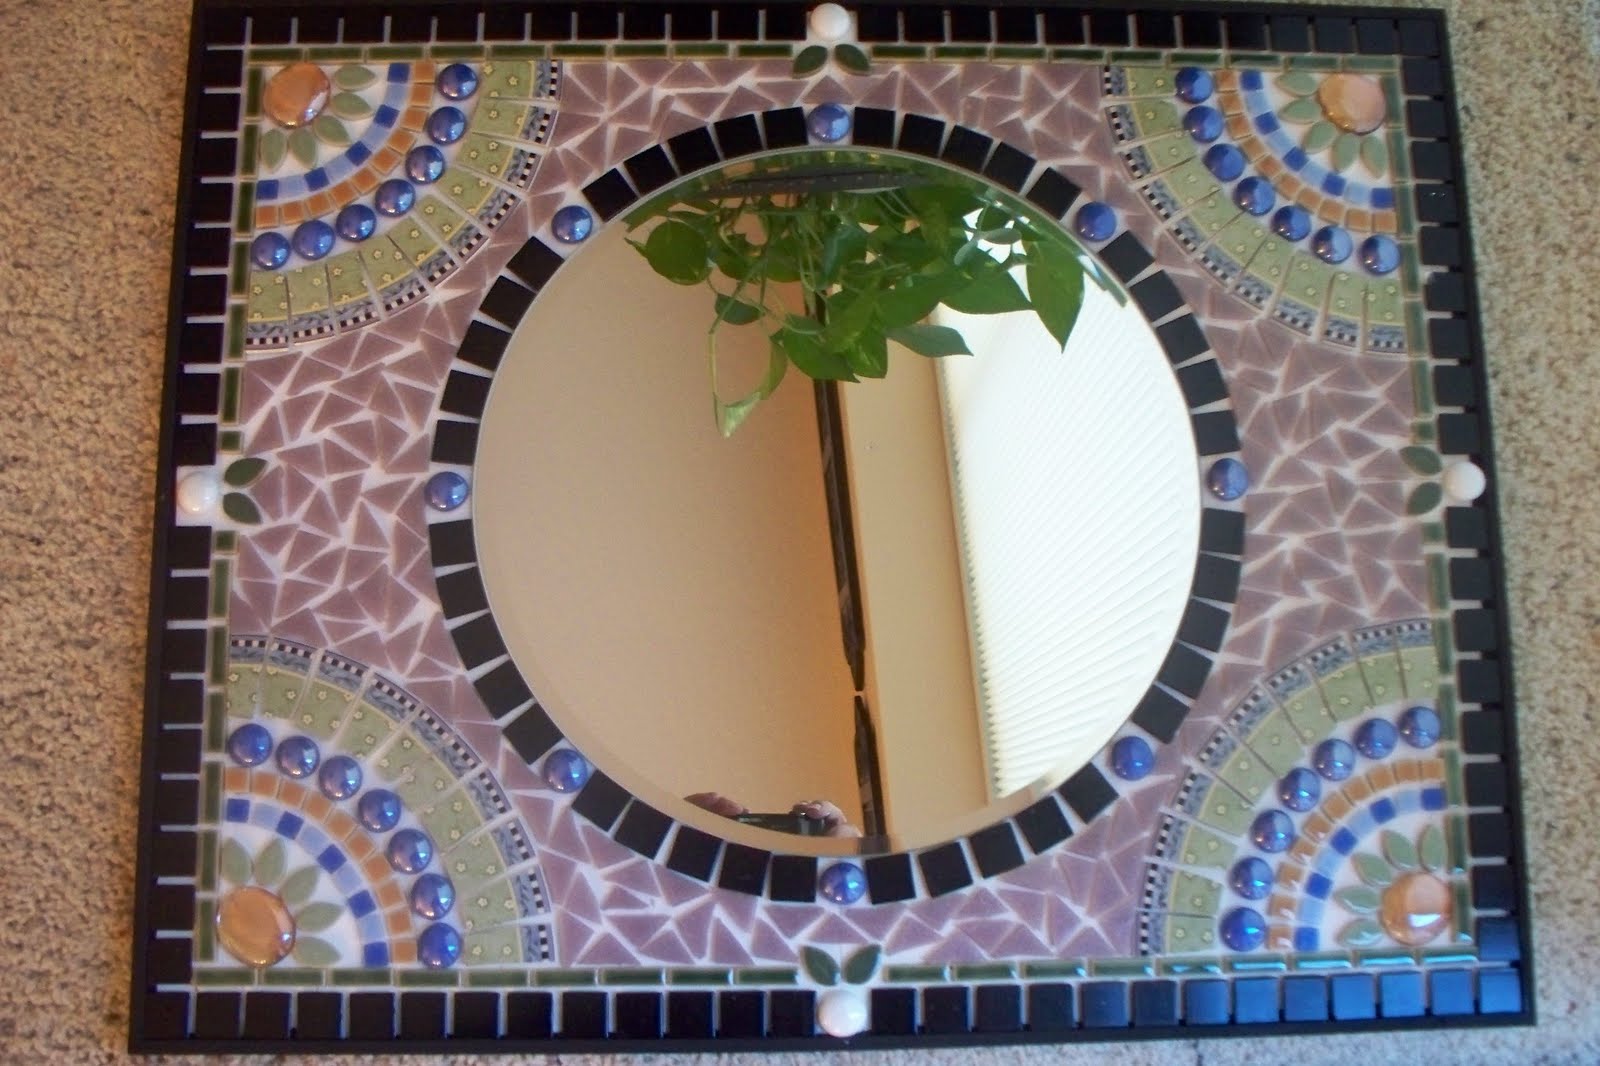
Originally I planned on grouting the entire thing in white but now am thinking of using the white at the corners and a lavender in the body of the piece. The lavender would make the lavender triangle tiles fade into the color rather than stand out.
Let me know what you think. I appreciate any input.
Saturday, April 3, 2010
Ocean Deep-My Newest Mosaic
A few weeks back I showed you my WIPs on this newest ocean-themed mosaic.
I ended up changing a few things around as the rectangular mirror I had in there to begin with was making the piece entirely too heavy. I opted for a 12" round, beveled mirror which actually gave me more room to put the design.
This is my interpretation of things found deep in the ocean from the little crab to the sand dollar. I also added a broken pottery vase and some "sea leaves".
The brown and blue with white beach pottery came from Australia and is just perfect for this theme.
It took me a long time to complete this one but I really enjoyed making it.


I ended up changing a few things around as the rectangular mirror I had in there to begin with was making the piece entirely too heavy. I opted for a 12" round, beveled mirror which actually gave me more room to put the design.
This is my interpretation of things found deep in the ocean from the little crab to the sand dollar. I also added a broken pottery vase and some "sea leaves".
The brown and blue with white beach pottery came from Australia and is just perfect for this theme.
It took me a long time to complete this one but I really enjoyed making it.


Saturday, March 6, 2010
Something a Little Different
I have been working on something that is a bit different from my usual mosaics this past week.
I decided to recycle this coat rack that I found one day and it has been a lot of fun. Originally it was a laminated looking brown wood (very 70's) that had 4 wooden dowels for the hooks. I thought to update it and paint it a gloss white, add some brushed nickel hooks, and mosaic the area that was once a carved leaf design.
I spend a lot of time in thrift stores and the Goodwill looking for dishes to cut into tiles and once in a while I come across a piece that I just can't pass up.


I decided to recycle this coat rack that I found one day and it has been a lot of fun. Originally it was a laminated looking brown wood (very 70's) that had 4 wooden dowels for the hooks. I thought to update it and paint it a gloss white, add some brushed nickel hooks, and mosaic the area that was once a carved leaf design.
I spend a lot of time in thrift stores and the Goodwill looking for dishes to cut into tiles and once in a while I come across a piece that I just can't pass up.


Tuesday, February 9, 2010
My Newest Mosaics
Here is one of my newest mosaics. This is a rustic metal tray that has a distressed expresso brown finish.
I love to combine the patterns of dish tiles with the various glass and ceramic tiles so that is what I did with this one.
My signature jewelry is embedded in here as well. It is the muted sage green earring with a little silver criss-cross over it toward the bottom.
My husband thinks this looks southwestern because of the rustic metal and the turquoise and copper colors used. What do you think?


 I place a cute little cobalt blue lady bug on top of one of the tiles for whimsey.

The black circles with gold around them are parts of a bracelet. The round knob was handpainted and can be used.

I love to combine the patterns of dish tiles with the various glass and ceramic tiles so that is what I did with this one.
My signature jewelry is embedded in here as well. It is the muted sage green earring with a little silver criss-cross over it toward the bottom.
My husband thinks this looks southwestern because of the rustic metal and the turquoise and copper colors used. What do you think?


As promised, I have taken a picture of the blue floral mosaic mirror and am posting it for you to see in the white grout.
Personally, I think it could have gone either way, black or white. Black grout would have given it an entirely different look and I wish I had two of them so that I could do one in black just for fun.
It would have defined the mirror more but I like the airy feeling of the suttle blue floral tiles. I also like that the black mini mosaics on the corners show up by using the white.
Personally, I think it could have gone either way, black or white. Black grout would have given it an entirely different look and I wish I had two of them so that I could do one in black just for fun.
It would have defined the mirror more but I like the airy feeling of the suttle blue floral tiles. I also like that the black mini mosaics on the corners show up by using the white.
I changed out the glass tiles around the focal piece at the top for the 3rd time.LOL
I thought the black would be much better with the white grout.
It was tough to get a good picture, not only because this is a very large mirror, but the skies are overcast and dark and didn't lend any light to the situation.
So here it is:
So here it is:
 I place a cute little cobalt blue lady bug on top of one of the tiles for whimsey.
The black circles with gold around them are parts of a bracelet. The round knob was handpainted and can be used.

Monday, February 8, 2010
Grout Picked for New Mosaic
Experimenting can be fun but also very time consuming. After I so carefully grouted the edges in white I still had to let it dry and pick out the overflow with a toothpick as you can see in this picture all along the border tiles.
Another time I will plan this in advance and make a more definite border to hold the grout.
 I didn't want to do a huge area with the black grout powder so here is what my experiment looked like. It's hard to tell in this small shot, but it was looking too busy for me along with the edges done in white.

In this photo I tried the white powder and feel the overall affect is better. It keeps the body of the mirror more solid and the edges more "lacey". The dishes have enough colors to carry off the white in my opinion.
 I will be finishing it today and will have pictures for you.
Another time I will plan this in advance and make a more definite border to hold the grout.
 I didn't want to do a huge area with the black grout powder so here is what my experiment looked like. It's hard to tell in this small shot, but it was looking too busy for me along with the edges done in white.
In this photo I tried the white powder and feel the overall affect is better. It keeps the body of the mirror more solid and the edges more "lacey". The dishes have enough colors to carry off the white in my opinion.
 I will be finishing it today and will have pictures for you.
 I also just finished a cute metal tray that I will put up on my next post. I would love any comments as to the tags I might use.
Saturday, February 6, 2010
Using Two Colors of Grout
I have been working on a new mosaic that I am ready to grout but I decided that I would try using two different colors. I think I will use white around the edges where all the black tiles are so that they will stand out, but I prefer to use charcoal on the interior part of the piece.
The dishes I used to make the tiles for this one are primarily various shades of blue flowers with green leaves on a white background, however, there are also hints of black so I chose to use that color as my contrast.
I originally used black glass tiles around the focal piece on top, but when I decided to grout that portion in charcoal I changed them out for white so they would show better. We'll see.
My signature jewelry is used in the focal piece and here and there around the mosaic. I also handpainted a knob for a little fun but it could actually hold something too.
This is a large mirror (20x24) so I put it on the floor to take this picture so that I could get it all in.
 Here are a few close-up shots so you will be able to see the difference once I grout it.
This is a new thing for me so I am anxious to see how it will look.


The dishes I used to make the tiles for this one are primarily various shades of blue flowers with green leaves on a white background, however, there are also hints of black so I chose to use that color as my contrast.
I originally used black glass tiles around the focal piece on top, but when I decided to grout that portion in charcoal I changed them out for white so they would show better. We'll see.
My signature jewelry is used in the focal piece and here and there around the mosaic. I also handpainted a knob for a little fun but it could actually hold something too.
This is a large mirror (20x24) so I put it on the floor to take this picture so that I could get it all in.
 Here are a few close-up shots so you will be able to see the difference once I grout it.
This is a new thing for me so I am anxious to see how it will look.


Monday, December 7, 2009
The Winner of the Mosaic/Gift Certificate Giveaway

I told you I would have my daughter pick a winning name from the jar, but since my grandson was over last night I let him do it.
The winner of the contest is "Missknits". She will have her choice of which mosaic she would like for her prize.
I want to thank all of you for entering and being a part of my very first contest on my blog. I will definitely be holding another soon.
Thursday, November 26, 2009
Gift Certificate Giveaway!
I have reached 100 followers and I want to celebrate with a contest. All 100 followers names have already been entered and placed in this jar.


I will give a $15.00 gift certificate to be used in my store http://www.memoriesinmosaics.etsy.com/ to the winner of this contest which will run until December 7th. I will announce the winner on my blog on the 8th of December.
It is open to anyone.
I will have my daughter, Terra, actually draw a name from this jar and take a picture for my blog. I prefer this over using the random drawing site. You will just have to trust me on this one.
Here are the ways you can enter your name to be put into the jar. There is no limit to how many chances you can have. Each time you do one of the following I will place your name in the jar I have here at home.
1. Become a follower-2pts. If you are already a follower you automatically get 1 pt.
2. Use one of my mosaics in a treasury and link back to me .-1pt.
3. Mention this contest on your blog and link back to me.-2pts.
4. Comment on this post-1pt.
5. Comment on the thread that I will have going in the forum under Promotions. It will say "Mosaic Gift Certificate Giveaway on my blog". Each "day" that you comment will give you 1 additional point. Be sure to mention that you are in this contest so that I can get your name.
6. Mention this contest anywhere else that can be linked back to me-1pt.
Saturday, October 10, 2009
Black Moon Rising
 I have been working on three different mosaics over the past few weeks, but getting any kind of photos has been really tough with the way the weather has been. It has been so humid that the mirrors fog over the minute you step outside so I had to try to get some indoors.
This is my newest one that I call "Black Moon Rising". The dish that I used was actually a huge brightly colored platter. I wish these pictures could do it justice, as the colors are fabulous, but what can you do?


Friday, October 9, 2009
Under the Sea


Saturday, September 19, 2009
Sunflower in a Pot Mosaic Mirror
This is my newest piece called "Sunflower". The center of the flower is actually a huge dangling earring that I thought would look great with the black and white edging. I hand painted the sunflower petals and used a real vase that I cut in half for the pot.
I was thinking of my daughter when I made this as it would be a great gift for someone's daughter. It's fun, colorful, and cheery.


I was thinking of my daughter when I made this as it would be a great gift for someone's daughter. It's fun, colorful, and cheery.


Wednesday, September 9, 2009
Grouting a Mosaic Tutorial
I did a piece on my blog not long ago on how I composed a mosaic, but I never really touched on grouting it so I thought I would share that now.
I suppose everyone has their own way of grouting, but the end result is the same. Here is how I grout a mosaic.
The first step is to gather all the supplies you will need throughout the process as it becomes terribly messy and you don't want to traipse around looking for something later.
I always have 2 buckets (one for grout and one for water), a spatula or wooden spoon for stirring your grout, plenty of sponges, rags, 2 surgical gloves (it's what I use because you can throw them away), water spritzer, mask( again, I use the surgical ones because you can toss it out).
 The next step is to get your grout mixed. This is where the mask comes in handy as the powder from the grout can go everywhere. I am using "charcoal" straight from the box so there isn't any custom mixing here. I use the sanded grout as I think it sets better and looks nicer when completed. You mix what you think you will use, but if there isn't enough it isn't a problem to just mix more. If it were a custom blend, then you will need to make plenty the first go around as the chances of mixing the exact blend a second time is nearly impossible. Ad just enough water to give it a consistency of smooth mud. It should not pour easily.
 This is the piece I have chosen to grout. I always put a lazy susan underneath it so that I can not only turn it but it keeps it up and off the newspaper and I can get to the edges better.
 After letting the grout "set" for 10 minutes (keeps it from cracking later), then I start to smooth it over my piece with my hands so that I can get it into all the nooks and crannies. I feel like I have a better control this way.

Here it is all grouted. Lovely, huh? I leave it like this for about 10 minutes or less then start to take most of it back off with a sponge and water.
 This step is probably the messiest of all, especially if you are using dark colored grout. I keep a bucket of clean water handy and just keep rinsing the sponge and cleaning it off. It took 6 buckets of clean water for me to get to the next step.
 Here it is mostly cleaned off. I leave it now for another 15 minutes or so and then continue to keep cleaning it off. The reason I do this instead of waiting until it is mostly dry is so that I can get the grout smooth in between each piece and especially around jewelry, gems or anything bulky. If you wait too long it gets clumpy and more difficult to get off.
 This is now clean enough to "set" until it is dry. I spritz it with water about every 20 minutes to keep it from cracking. I probably do this about 4 to 5 times during the drying process. You can also put it inside a trash bag and seal it off and let it dry slower to prevent cracks, but I like to see what it is doing. The spritzed water also keeps the grout looking smooth.
  I just use any bottle I have around that will give a lite mist of water. You don't want to drench the thing. I will give it most of the day to dry, but I usually go around with a toothpick and clean any excess grout off my tiles and around the gems. If you wait until it is completely dry you can create a small crevice in the grout and there isn't much you can do except add more grout. When it is still damp you can spritz it and it will run back together making it smooth.
 That is all there is to it. I will put up the finished piece tomorrow so you can see the final product. I have another piece I am grouting in the charcoal so I will show that one as well.
I suppose everyone has their own way of grouting, but the end result is the same. Here is how I grout a mosaic.
The first step is to gather all the supplies you will need throughout the process as it becomes terribly messy and you don't want to traipse around looking for something later.
I always have 2 buckets (one for grout and one for water), a spatula or wooden spoon for stirring your grout, plenty of sponges, rags, 2 surgical gloves (it's what I use because you can throw them away), water spritzer, mask( again, I use the surgical ones because you can toss it out).
 The next step is to get your grout mixed. This is where the mask comes in handy as the powder from the grout can go everywhere. I am using "charcoal" straight from the box so there isn't any custom mixing here. I use the sanded grout as I think it sets better and looks nicer when completed. You mix what you think you will use, but if there isn't enough it isn't a problem to just mix more. If it were a custom blend, then you will need to make plenty the first go around as the chances of mixing the exact blend a second time is nearly impossible. Ad just enough water to give it a consistency of smooth mud. It should not pour easily.
 This is the piece I have chosen to grout. I always put a lazy susan underneath it so that I can not only turn it but it keeps it up and off the newspaper and I can get to the edges better.
 After letting the grout "set" for 10 minutes (keeps it from cracking later), then I start to smooth it over my piece with my hands so that I can get it into all the nooks and crannies. I feel like I have a better control this way.
Here it is all grouted. Lovely, huh? I leave it like this for about 10 minutes or less then start to take most of it back off with a sponge and water.
 This step is probably the messiest of all, especially if you are using dark colored grout. I keep a bucket of clean water handy and just keep rinsing the sponge and cleaning it off. It took 6 buckets of clean water for me to get to the next step.
 Here it is mostly cleaned off. I leave it now for another 15 minutes or so and then continue to keep cleaning it off. The reason I do this instead of waiting until it is mostly dry is so that I can get the grout smooth in between each piece and especially around jewelry, gems or anything bulky. If you wait too long it gets clumpy and more difficult to get off.
 This is now clean enough to "set" until it is dry. I spritz it with water about every 20 minutes to keep it from cracking. I probably do this about 4 to 5 times during the drying process. You can also put it inside a trash bag and seal it off and let it dry slower to prevent cracks, but I like to see what it is doing. The spritzed water also keeps the grout looking smooth.
  I just use any bottle I have around that will give a lite mist of water. You don't want to drench the thing. I will give it most of the day to dry, but I usually go around with a toothpick and clean any excess grout off my tiles and around the gems. If you wait until it is completely dry you can create a small crevice in the grout and there isn't much you can do except add more grout. When it is still damp you can spritz it and it will run back together making it smooth.
 That is all there is to it. I will put up the finished piece tomorrow so you can see the final product. I have another piece I am grouting in the charcoal so I will show that one as well.
Wednesday, July 8, 2009
A Mosaic Journey Part 3
I have finally finished my Flamingo Mosaic and can complete this series of "A Mosaic Journey".
The last time I posted on this I was still in the process of designing it. It took me quite some time to decide how I wanted to finish this one. I had some difficulty with the palm fronds and how I wanted them to look. As I said before, some creations come right to you in a whirlwind while others seem to be a constant challenge.
This first picture is the mosaic ready for grout. Everything has been shaped, cut and glued down.
 After the piece has had a chance to dry for a few hours I take a damp cloth and go over each and every item in the design to get rid of any buildup from the grout. I want to be sure each tile shows through completely as sometimes they get buried under the grout and may be missed on the first cleaning.

The last time I posted on this I was still in the process of designing it. It took me quite some time to decide how I wanted to finish this one. I had some difficulty with the palm fronds and how I wanted them to look. As I said before, some creations come right to you in a whirlwind while others seem to be a constant challenge.
This first picture is the mosaic ready for grout. Everything has been shaped, cut and glued down.

This picture of my grouting is a bit on the blurry side as it dawned on me when I was in the middle of it that I wanted to get a picture. I had my gloves on and had grout everywhere when I shot this one .
 After getting the grout into all the nooks and crannies I take a very wet sponge and get most of it back off before it has any chance to settle. It requires going to the sink several times for another bucket of clean water as grout clouds it up pretty quickly. Time is a big factor as well because the grout starts to set right away. Once I get it cleaned off to my satisfaction I come back to it about every half hour and spritz it with water to keep the grout from cracking. I do this about 5 or 6 times.
Grouting is not a fast process so you definitely have to set aside some time.
 After the piece has had a chance to dry for a few hours I take a damp cloth and go over each and every item in the design to get rid of any buildup from the grout. I want to be sure each tile shows through completely as sometimes they get buried under the grout and may be missed on the first cleaning.
Once the piece has dried overnight I go over each and every item again with a toothpick to remove any residue from the corners. I do this because I want all my tiles to have a straight edges and the gems to show as much as possible. The grout has a way of hiding parts of your design if you don't do this.


Here is a closeup of a really fun knob my sister sent me that I chose to put into this mosaic to give it some dimension. I just drill a hole and fasten it to the back.


This aqua colored rhinestone brooch is what I chose as a focal point for the top of the piece. It's fun and colorful.

This is the finished mosaic. With this much mirror in a design it becomes a challenge to get a good full-sized picture as it mirrors all the images in front of it. The weather hasn't permitted going outside so I took this by the back sliding doors. I'll have to get a better one for my listing, but thought this would at least give you the idea.
The very last thing I do before putting it up for sale is to install a hanger, sign the back and tape a business card in place.


This is the finished mosaic. With this much mirror in a design it becomes a challenge to get a good full-sized picture as it mirrors all the images in front of it. The weather hasn't permitted going outside so I took this by the back sliding doors. I'll have to get a better one for my listing, but thought this would at least give you the idea.
The very last thing I do before putting it up for sale is to install a hanger, sign the back and tape a business card in place.

Thursday, May 14, 2009
Tropical Delight Mosaic Mirror

 This is my newest creation. All the dish tiles are in bright and cheery colors that remind me of the tropics. The view is of our pool which we designed it to look like we were on vacation.
 I've decided to take a turn in some of my designs so my next project will be somewhat different than you might normally see from me. I will also keep a photo journal of my progess and share it on this blog. So stay tuned.
Subscribe to:
Posts (Atom)