Most of you know me as a mosaic artist, but I also have a vintage store and a mosaic supply shop.
Recently Etsy offered a one time chance to change the names of our shops and I decided to do that with my supply store that is currently named Memories Mosaic Supply.
Originally, I wanted to keep the word "Memories" in each shop to continue the link of my name (Memories in Mosaics; Memories of Yesterday and Memories Mosaic Supply) but I realized later that it wasn't really the right term for what I wanted people to remember about my shop.
My new name will be "Discount Mosaic Supply". I will be offering lower prices and a larger variety of items to my regular inventory of hand cut tiles. I plan to add glass gems, glass and ceramic tiles and more focal pieces over the next few months.
My Mosaic shop will be changing too. I have decided to concentrate in other areas and will not be producing new pieces as much anymore. I will still offer custom orders, but my inventory will be less overall. I have come to the conclusion that I just can't sit at my computer as much as needed to keep all 3 shops promoted and right now my inventory for my vintage shop just keeps growing.
My husband and I are in our mid 50's and all our children are grown and out of the home, so we wanted something we could do together. Hunting through Estate Sales, Garage Sales and Thrift shops is a lot of fun for the two of us and something we both love to do, so my vintage shop won out over my mosaics.
I hope you will stop by and check out my shops. I will give 10% off to anyone who reads my blog in each of my stores. Just use coupon code "Blog10" when you check out.
My mosaic shop is http://www.memoriesinmosaics.etsy.com/
My vintage shop is http://www.memoriesofyesterday.etsy.com/
My supply shop is still http://www.memoriesmosaicsupply.etsy.com/ but soon will be
http://www.discountmosaicsupply.etsy.com/
Until Next Time :)
Showing posts with label custom mosaic. Show all posts
Showing posts with label custom mosaic. Show all posts
Thursday, October 20, 2011

Monday, March 21, 2011
Customer's Photos of Custom Mosaic
Doing a custom mosaic is always a challenge because you have so many variables going on, such as colors, patterns and overall design that you just hope what you have in the end is what your customer wants.
Thankfully this mosaic was a take-off from one I had in my shop. The size changed as did the dish tiles and some of the coordinating pieces, but the overall design was the same.
My customer wanted a large mirror for her bathroom. This one finished out at 28" x 32" with a 22" mirror in the center. Fortunately I was able to purchase such a large mirror at an IKEA store.
I just got the photos in my email today from this custom mosaicI did several months ago. The woman was pregnant and her baby was due the following month so she was rather busy.
Here are the photos she sent to me.


Thankfully this mosaic was a take-off from one I had in my shop. The size changed as did the dish tiles and some of the coordinating pieces, but the overall design was the same.
My customer wanted a large mirror for her bathroom. This one finished out at 28" x 32" with a 22" mirror in the center. Fortunately I was able to purchase such a large mirror at an IKEA store.
I just got the photos in my email today from this custom mosaicI did several months ago. The woman was pregnant and her baby was due the following month so she was rather busy.
Here are the photos she sent to me.


Tuesday, February 8, 2011
It's Finished!
I finished the custom mosaic this morning. I had a few areas that needed a little more grout so I mixed a small batch and worked on that then painted the back a flat black.
I applied 5 coats of sealant to the grout knowing it will be hung above a stove so I hope the extra will help it to repel staining. I am enclosing some of the powdered grout I used in a baggie so that if it should get some sort of stain on it the customer can easily fix it.
Since the area is cramped for space I decided it might be a good idea to use picture frame wire for hanging. Usually I would hang 20lb. D-rings on either side assuming the customer would have large hooks, but I think it will be a bugger to try and hang it that way with the cabinets hanging down and obstructing the view.

I applied 5 coats of sealant to the grout knowing it will be hung above a stove so I hope the extra will help it to repel staining. I am enclosing some of the powdered grout I used in a baggie so that if it should get some sort of stain on it the customer can easily fix it.
Since the area is cramped for space I decided it might be a good idea to use picture frame wire for hanging. Usually I would hang 20lb. D-rings on either side assuming the customer would have large hooks, but I think it will be a bugger to try and hang it that way with the cabinets hanging down and obstructing the view.
 |
| The finished size is 16x28 |

Monday, February 7, 2011
Custom Mosaic-Grouting
First of all I want to thank all of you who have commented on my mosaic. I appreciate your taking the time to do so and to let me know that you like my work.
I got the OK this morning from my customer and have grouted the mosaic. It took about an hour which includes the 10 minutes of letting the grout set up.
I got a little carried away with mixing too much this time, but since I normally have a mirror in the middle I wanted to be sure I had plenty. I guess too much is better than too little.
Later tonight before the grout becomes too hard I plan to clean the residue off all the tiles and gems with a toothpick. I do this while it's still slightly damp so that I can smooth the grout back out should it leave a crevice or marking. If you wait until it is totally dry and you find that you have a few tiles that are still partially buried in the grout you end up with a "ledge" where you scraped it away if one tile sits slightly lower than another.
I try to keep my tiles thickness as consistent as possible when I make my pieces but sometimes the dish tiles are thicker than the glass tiles and the variance can cause a problem when grouting. To make the transition as smooth as possible I clean the bulk off of it right away.
Tomorrow will be the final post on making a custom mosaic. I will have a few photos of the finished piece.
Until Next Time. :)
I got the OK this morning from my customer and have grouted the mosaic. It took about an hour which includes the 10 minutes of letting the grout set up.
I got a little carried away with mixing too much this time, but since I normally have a mirror in the middle I wanted to be sure I had plenty. I guess too much is better than too little.
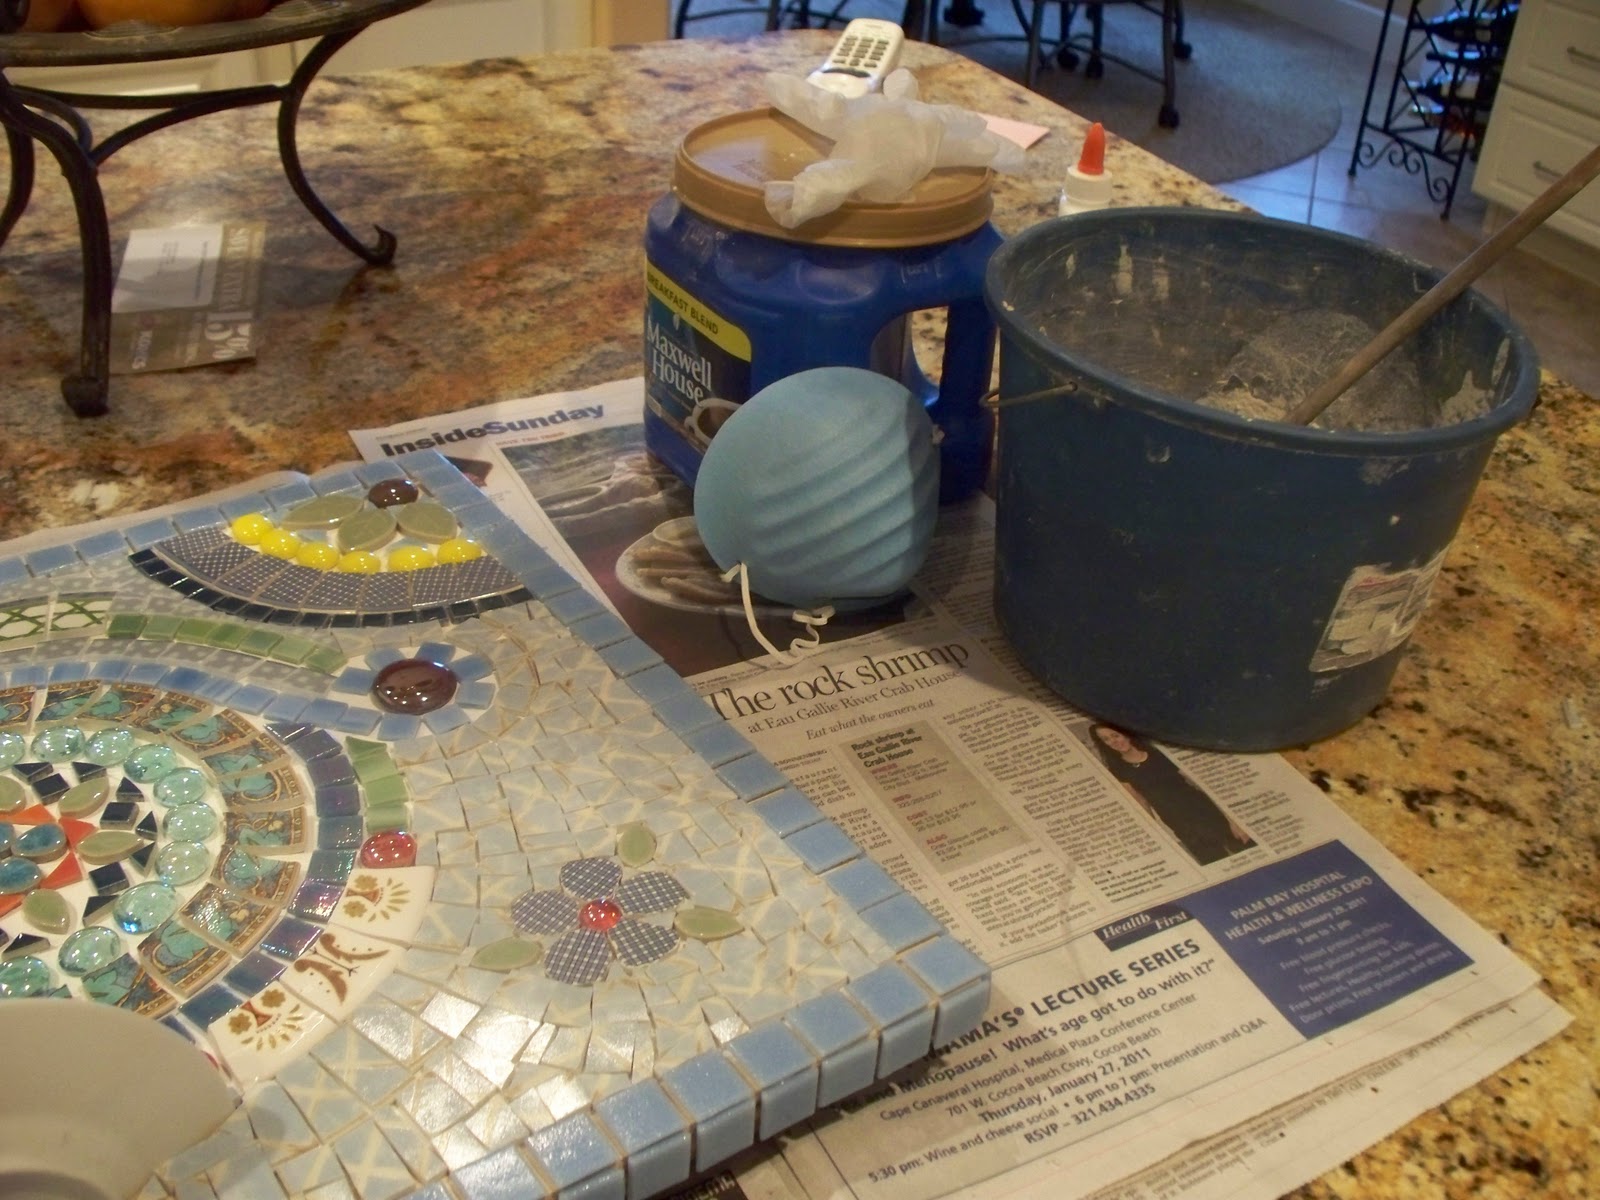 |
| My supplies gathered to grout. I always wear a mask but the gloves usually come off because they catch on the tile edges. |
 |
| My grout is mixed and I am waiting for 10 minutes for it to "set". It should be the consistency of a brownie mix. |
 |
| Photo just before I grout. |
 |
| This is how it looks once I finish getting the grout in all the crevices. I don't like to leave all of that on for too long as it just gets harder to remove it. |
 |
| This is how it looks after my first cleaning. There is still a lot of residue but the clumps are removed and I smooth out any lines created from the sponge. |
I try to keep my tiles thickness as consistent as possible when I make my pieces but sometimes the dish tiles are thicker than the glass tiles and the variance can cause a problem when grouting. To make the transition as smooth as possible I clean the bulk off of it right away.
Tomorrow will be the final post on making a custom mosaic. I will have a few photos of the finished piece.
Until Next Time. :)
Tuesday, February 1, 2011
Custom Mosaic -Adding the Shelf
My husband embedded the little half salad plate into the base of the mosaic and glued all around it. We had to let that dry before applying another coat of glue which has taken several days to complete. He finished it off using some wood filler so once I finish with filling in the rest of the design I can grout around it and it should be good to go.
I also painted the back black not only because I like a finished piece, but to camouflage the Spackle on the back from the plate.
Tonight I hope to complete the mosaic and have a photo of it emailed for approval. Once I get that I will grout it, which will take at least two days to cure, then clean it up and ship it out. I take a toothpick around each tile, gem and doodad in each of my mosaics. It takes time but I believe the finished product is worth it.
My next post will be on grouting. I hope to be doing that as soon as I hear back from my customer on the design.
Until Next Time. :)
I also painted the back black not only because I like a finished piece, but to camouflage the Spackle on the back from the plate.
 |
| This is a photo of the plate just laying on top. |
 |
| Here is the plate embedded into the wood. |
 |
| Back view showing the wood filler. |
My next post will be on grouting. I hope to be doing that as soon as I hear back from my customer on the design.
Until Next Time. :)
Saturday, January 29, 2011
Custom Mosaic Continued
I have started piecing the tiles to fill in around the main design. This takes time and patience as you want to get them as close together as possible and there are lots of curves to go around.
 I found some fun bright yellow dishes with a royal blue pattern and I thought it would be the perfect thing to go with this mosaic. I used them in the fan design at the lower left side. They are rather thick dishes and would be too much of a variance in height for many of the tiles, but it works when you have the gems butted up against them.
 The photo above is upside down so I could work on filling in the top. I decided to glue what I have down and let my husband get the half plate embedded on the bottom (for a shelf). He will need to cut out the area I have sketched in and set the rough edge of the plate down inside the wood. He will then fill in any areas with wood glue and let dry overnight.
Next my husband will sand down the glue so that it's flush with the mosaic front and back.
After that I can finish it up and see what my customer thinks before I grout. At this point I can still change things around a bit. Hopefully this will be good to go.
 The dish tiles on the bottom of this photo are very similar in color but have a completely different design. One has light blue polka dots against a darker blue and one has light blue swirlys against a darker blue background. It keeps the continuity and flow but creates more interest.
I'll show you the little "shelf" once it's dry and sanded.
Until Next Time. :)


Next my husband will sand down the glue so that it's flush with the mosaic front and back.
After that I can finish it up and see what my customer thinks before I grout. At this point I can still change things around a bit. Hopefully this will be good to go.

I'll show you the little "shelf" once it's dry and sanded.
Until Next Time. :)
Thursday, January 27, 2011
Custom Mosaic Part 2
 |
| Just getting the feel of the design. |
 |
| I changed the tiles a bit and have added my flowers. |
I have been working pretty steadily on this mosaic and have it partly laid out. I have changed a few things from the original drawing, but it will still have the same look when I have finished it.
My customer wants lots of bright and light colors so I am doing my best to keep to that. I cut the flowers out of the checkered pattern dishes to keep the country feel to this.
The pencil markings toward the bottom are where the shelf made from the salad plate will go. I just want to be sure I don't tile over that area.
Just a few more to lay out and I will run this by my customer to make sure we are on the same track. If she is good to go I will probably glue down what I have to keep it from shifting while I design the rest.
I should have my progress here on my blog in the next day or so.
Until Next Time. :)
Subscribe to:
Posts (Atom)